Workspace forks
Workspace forks allow users to create independent copies of a workspace, enabling parallel development workflows similar to git branches and GitHub forks.
How workspace forks work
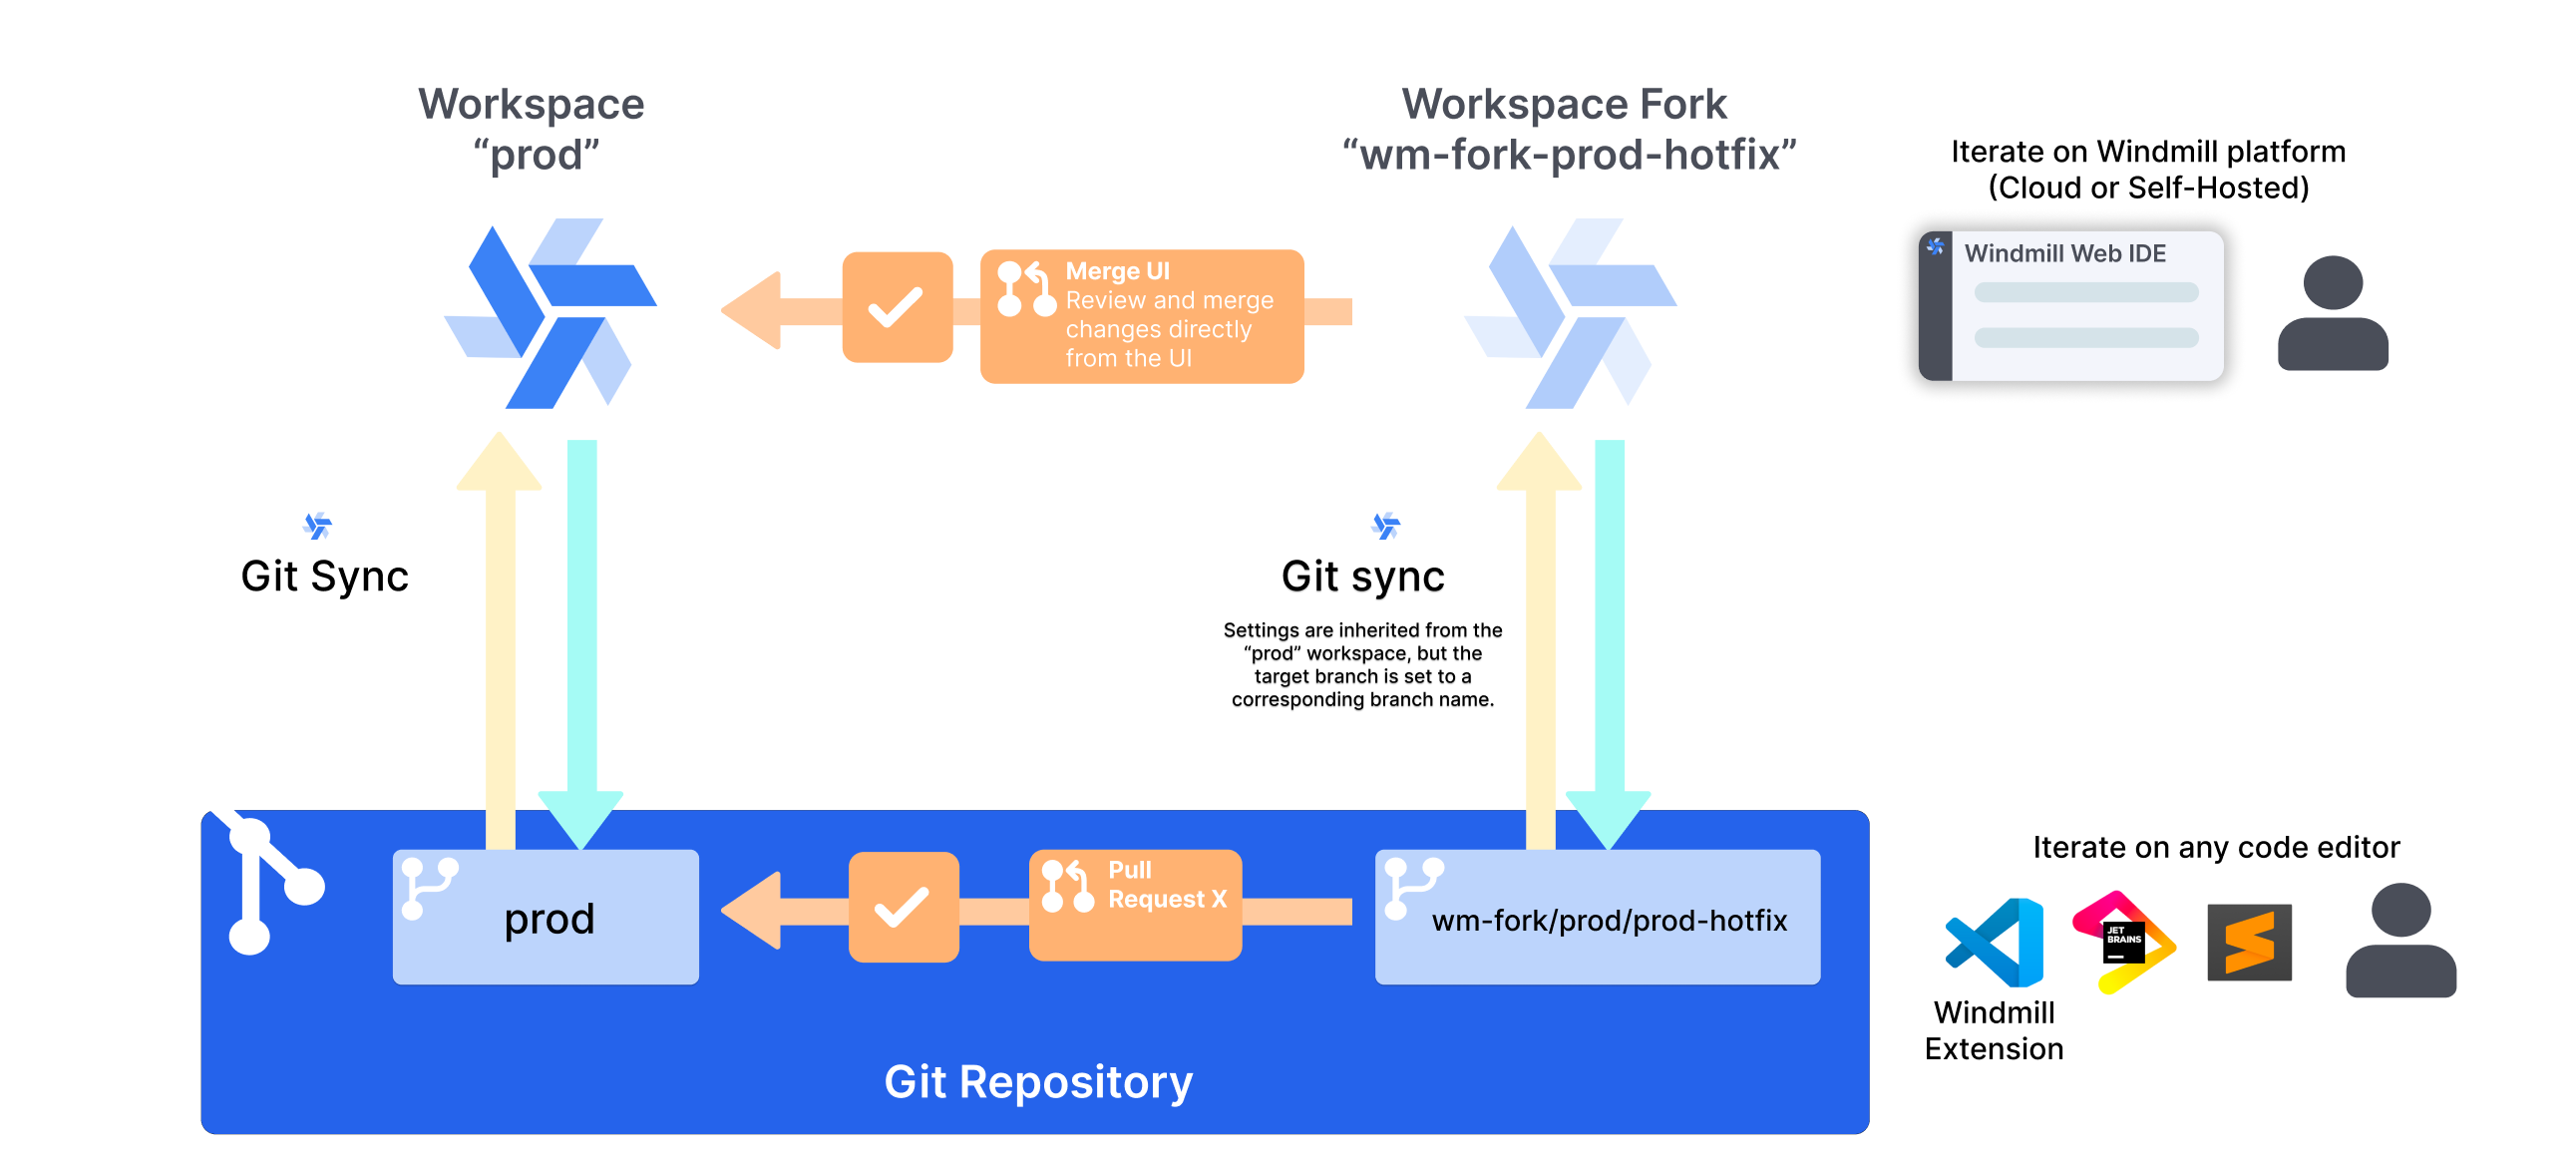
Workspace forks create a complete copy of your workspace, including scripts, flows, apps, resources, and variables. Each fork operates independently and changes can later be merged to a parent workspace through a couple of methods.
Key features:
- Independent development: Make changes without affecting the parent workspace
- Git integration: Automatically creates corresponding git branches using the git sync workflow
- Team collaboration: Multiple developers can work on separate forks simultaneously
Example feature development workflow
- Create fork: Fork the main workspace for new feature development
- Develop: Make changes in the forked workspace
- Create PR: Use github/gitlab to create a pull request
- Review & merge: Team reviews changes before merging to main branch
- Sync back changes: Changes are automatically synced to the workspace linked to the main branch
Managing workspace forks
Prerequisites
- Being on a self-hosted EE instance
- Git sync configured (optional, required only for git-based workflows)
- CI/CD actions to merge back from the git remote to Windmill (only required for git sync workflows)
Fork creation
From the UI
- Navigate to the workspace you want to fork.
- Click on the Workspace menu on the sidebar.
- Click on
Fork current workspace. - Configure the name and id and then press on the
Fork workspacebutton.
From the CLI
- Enter the local repo being synced with the workspace you want to fork.
- Run
wmill workspace forkand follow the prompts to name your workspace. This will use yourgitBranchessettings on yourwmill.yamlto determine which workspace to fork from based on the branch you are on. - The fork will be created on your instance and is ready to be worked on.
- Run the command shown on your terminal to create the corresponding branch and start adding edits to your newly created fork!
Deleting a fork
Workspace forks can be deleted by their creator, or by any workspace admin.
From the UI
Just press the cogwheel on the sidebar and select the option to delete the workspace fork.
From the CLI
- Find the workspace profile corresponding to the workspace fork using the
wmill workspacecommand. - If missing, add it using
wmill workspace add - Now run
wmill workspace delete-fork <profile_name>
Permissions and access
Forks can be created by any user of the workspace. Roles and access will be the same as in the original workspace. All users of the original workspace can join the fork at any time, which will make it appear as another workspace on their menu.
Git sync integration
When workspace forks are used with git sync, Windmill will automatically create a git branch on the same repository as the parent workspace, and keep track of changes there. External changes to the branch are then synced back to the forked workspace if the appropriate CI/CD actions are setup. Once the changes are ready, a PR can be opened to sync back changes to the original workspace.
Workspace forks can be used with git sync for full version control integration. If using git sync, make sure to have it properly setup and in particular the CI/CD actions specific to forks should be set. Make sure to not forget the push-on-merge-to-forks.yaml action.
Fork and branch naming
Forks workspace IDs are always prefixed by wm-fork-. The associated branch name is always prefixed by wm-fork/<originalBranch>/ where <originalBranch> is the branch that is associated with the original branch was worked from.
For example:
| Workspace ID | Default or selected branch of repo associated with workspace | Fork Workspace ID | Branch associated to fork |
|---|---|---|---|
| windmill | main | wm-fork-feature1 | wm-fork/main/feature1 |
This naming convention is what enables Windmill to match branches to workspaces without having to reconfigure it for each branch. This is why fork workspace ids and branch names cannot be changed.
Synchronization and merging
Simple edits with the deployement UI
Once a fork is created, it is automatically setup to deploy to its parent branch. You can deploy any item to the parent branch directly from the UI by clicking it and selecting Deploy to staging/prod. Learn more about the Deployment UI.
Merge workspaces from the UI
You can merge changes from a forked workspace back to its parent workspace directly from the UI without requiring git sync. This provides a simpler workflow for teams that don't need full git integration.
To merge a fork:
- Navigate to the forked workspace
- On the home page, a banner will show you the diff with its parent workspace. Click
Review & Deploy Changes - Review the changes and confirm the merge
Items behind and conflicts
If it is detected that some of the differences come in fact from the original workspace, these changes will be shown as 'behind'. Before deploying, all behind changes must be updated into the fork and properly tested. When an items has changes that are both ahead and behind, it will be marked as a conflict and will be warned to the user. The user must then review the diff and decide how to edit the item to resolve the conflicting changes. Until deployed or updated however, the item will still be marked as a conflict. For more granular conflict detection and better tracked resolution, you can choose to merge the workspaces through a git workflow instead.
The merge will transfer all selected scripts, flows, apps, resources, and variables from the fork to the parent workspace.
Git sync based merging
When git sync is properly setup, the workspace is synchronized with one of the branches in your repo, and the forks are also synchronized with their own branches. It is then possible your preferred git workflow to merge into or out of these branches to sync, so you can update the fork, or deploy changes into the parent workspace.